Manual
Browser Compatibility
It is recommended to use this app on a desktop/laptop instead of on mobile.
The app has been tested on recent versions of Google Chrome and and Microsoft Edge. Internet Explorer is not fully compatible. Since this is a client-side app (It is run entirely by your browser, no data is sent back the server for processing!), some essential functions may not work if your browser hasn't been updated for a long while, or your device places many restrictions on it. Javascript must be enabled for this site.
This site does not use any cookies.
PWA : This app can work offline, using the features of Progressive Web Apps . Click the 'Try Offline' button in the footer to cache the resources
to do so (this will only take around 3 MB of space). If your browser supports these features, it will show you an option
to install this website as a native application on your system! On mobile, you can equivalently save it to the Home Screen.
Note : On desktop, PWAs may not be fully supported in browsers other than recent versions of Chrome, Edge & Safari.
Even without the installable app, you will be able to use the website without an internet connection.
You can clear the cached website from your browser settings if you wish to do so.
Miscellaneous notes
- When you create the add-on, commands to build all the images that were uploaded and processed
will be written into it. Even a single map contains 128×128 = 16384 visible blocks to be placed (which is a
lot!), so the commands are split into 2 sets per map and written into seperate function files (they are
regular commands like
/setblock, but Minecraft can then execute upto 10,000 (by default) of them at once from these files). More instructions on running the functions are given below.
Read more about functions in Minecraft. - The converted images seen after you click the 'Process Image' button may vary slightly (especially in the "noise" generated due to Image Dithering) depending on your device / browser (Since part of the image resizing operations are performed by your browser). This is unavoidable.
- The commands use relative ˜ (tilde notation) to specify the positon, so that the image can be built wherever you (the player, or a command block if you are using one) are located in your world when starting, instead of a specific area every time.
- For the 3D arrangement, the max height specification only ensures that blocks do not get
placed beyond that height, but the limit may not be reached at all - it depends on the colours in the
image. You may find, after building it, that the blocks did not reach that height anyway.
The limit does not majorly affect the final appearance. (The shade of each block depends on the height difference between it and the block immediately North of it. This is usually 2 blocks, but may have to abruptly change near the height limit. For this reason, it is recommended not to keep a very low limit.) - The fill commands to clear the map volume of existing blocks (default, unless you checked the "Replace only air blocks" option) may fail in case your simulation distance is too low. In this case, existing terrain above and below the 3D map blocks will remain, possibly hiding the blocks that were placed there.
In Minecraft
-
Import and apply the behaviour pack to your world(s).
Note : Cheats & Operator permissions must be enabled to use functions. If you want to earn achievements in that world or keep cheats off, you'll have to place the blocks manually (You can look at the Survival Guide for some help). -
Go to the location where the image is to be built, and open a Level 0 (smallest size) map there.
- If you entered an Origin in Absolute Coordinates for this image, go to the same location.
- Otherwise you can build the map art anywhere you like. Check that the starting block you choose is aligned with the top-left (NW) corner of the map!
Height-wise, it will be built at the block in which you are standing (2D), or for the 3D palette, extending from this height till [specified height range] blocks upwards (Also check that this doesn't cross the world build height!). -
If your image covers an area of axb maps, there will be
2 * a * bcommands to be executed in order, numbered image_name/1, image_name/2, ... so on. Each of these builds a part of the image, covering a vertical half of one map (64x128), arranged in order as illustrated in the figure alongside.
- If the 'Teleport nearest player' option was enabled (by default), running each function will teleport you (the nearest player) to the corner of the next zone (marked by small black squares in the figure) after it executes, so that you "move along" as you're running the functions one-by-one. A glowstone block may also be placed under you to identify the corner - you must be standing exactly on top of it.
- If you entered an Origin in Absolute Coordinates for this image, it is okay to move around in between and the block you are standing in while running each command doesn't matter. However if you didn't pre-specify coordinates, the zone will be built relative to where you are standing, so it is crucial that you run the next commands while staying at the correct/teleported location.
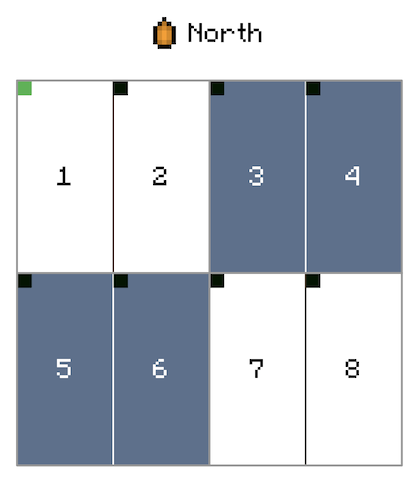
Example arrangement for an art covering 2x2 maps. -
The syntax of the function command is /function image_name/number.
For example, if your image's name was wallpaper, and its size was 2x1 maps, you would need to run the commands/function wallpaper/1 /function wallpaper/2 /function wallpaper/3 /function wallpaper/4
Note : You may need to restart Minecraft and then run the /reload command first, in case they don't appear in the commands screen or minecraft hasn't recognised the functions
-
You're Done!
Once you've constructed the image, map the entire area covered by it and build a map wall for your pixel art!
It's also a good idea to lock the maps with glass panes to prevent them from updating if some other structures are built above them, or if the colour palette changes in future updates.
If you included more than 1 image in the same pack, repeat steps 2-4 for each.
Note : If you see that many blocks are missing, especially in a zig-zag like pattern along chunk borders near the bottom half of each zone (see Issue#5 on GitHub), it is probably due to your simulation distance being too low. You can try the following fixes :
- Enable the 'Use only structures instead of setblock' command option in the addon generator options if it wasn't checked. For structures to finish loading, you may need to move around the map after running the commands to bring all chunks briefly into simulation distance, though you don't need to run any function again.
- Increase your simulation distance further (at least ≥ 10 chunks). Although the upper limit allowed by Minecraft is device-depenedent.
- Ask a friend or other player to join your world and stand near that opposite corner to keep those chunks loaded while you run the commands
- Only if you had pre-specified an Origin in Absolute Coordinates for the image, you can yourself move to the unloaded corner and run the same function again to fill it in.
Example behaviour pack
This is the file structure of an example behaviour pack generated by this app. It contains 2 images - one with the function name "cliff" of size 2x1, and another named "bastion" of size 3x2. You can run the commands as described above to build these images.
  behaviour pack.mcpack
   │
   ├─ manifest.json
   ├─ pack_icon.png
   ├─ structures/
   │    └─ mapart/
   │         └   ...
   └─ functions/
        ├─ cliff/
        │    ├─ 1.mcfunction
        │    ├─ 2.mcfunction
        │    ├─ 3.mcfunction
        │    └─ 4.mcfunction
        └─ bastion/
             ├─ 1.mcfunction
             ├─ 2.mcfunction
             ├     ...
             └─ 12.mcfunction
- The
manifestspecifies :- The minimum game version -
1.21.0(of Minecraft) - Behaviour pack version -
1.0.0is used for each pack by default. (Only this sample pack has version 4.5.0) - The name and description that you entered, will be displayed for the add-on in game.
- 2 version-4 UUIDs to uniquely identify the pack, generated randomly using the JS web Crypto API.
- The minimum game version -
The pack contains some structures (with block data) of a few blocks that may decay or need support (non-solid blocks) etc - these structures are used instead of the setblock command to overcome those limitations. Every pack will contain these even if they are not used in any image(s).
To view/edit/replace the files inside, just rename the .mcpack extension to .zip
and extract all contents using any Compressed (ZIP) folder utility.